> ## Documentation Index
> Fetch the complete documentation index at: https://docs.brightdata.com/llms.txt
> Use this file to discover all available pages before exploring further.
# Azure Entra ID SSO setup
> Step-by-step guide to configuring Azure Entra ID (formerly Azure Active Directory) SSO and SCIM provisioning with Bright Data in 6 steps.
* Prepare application
* Setup SSO
* Setup SCIM provisioning
## How to prepare the application
* Go to [https://entra.microsoft.com/](https://entra.microsoft.com/) and log in to your account.
* Create Enterprise application:
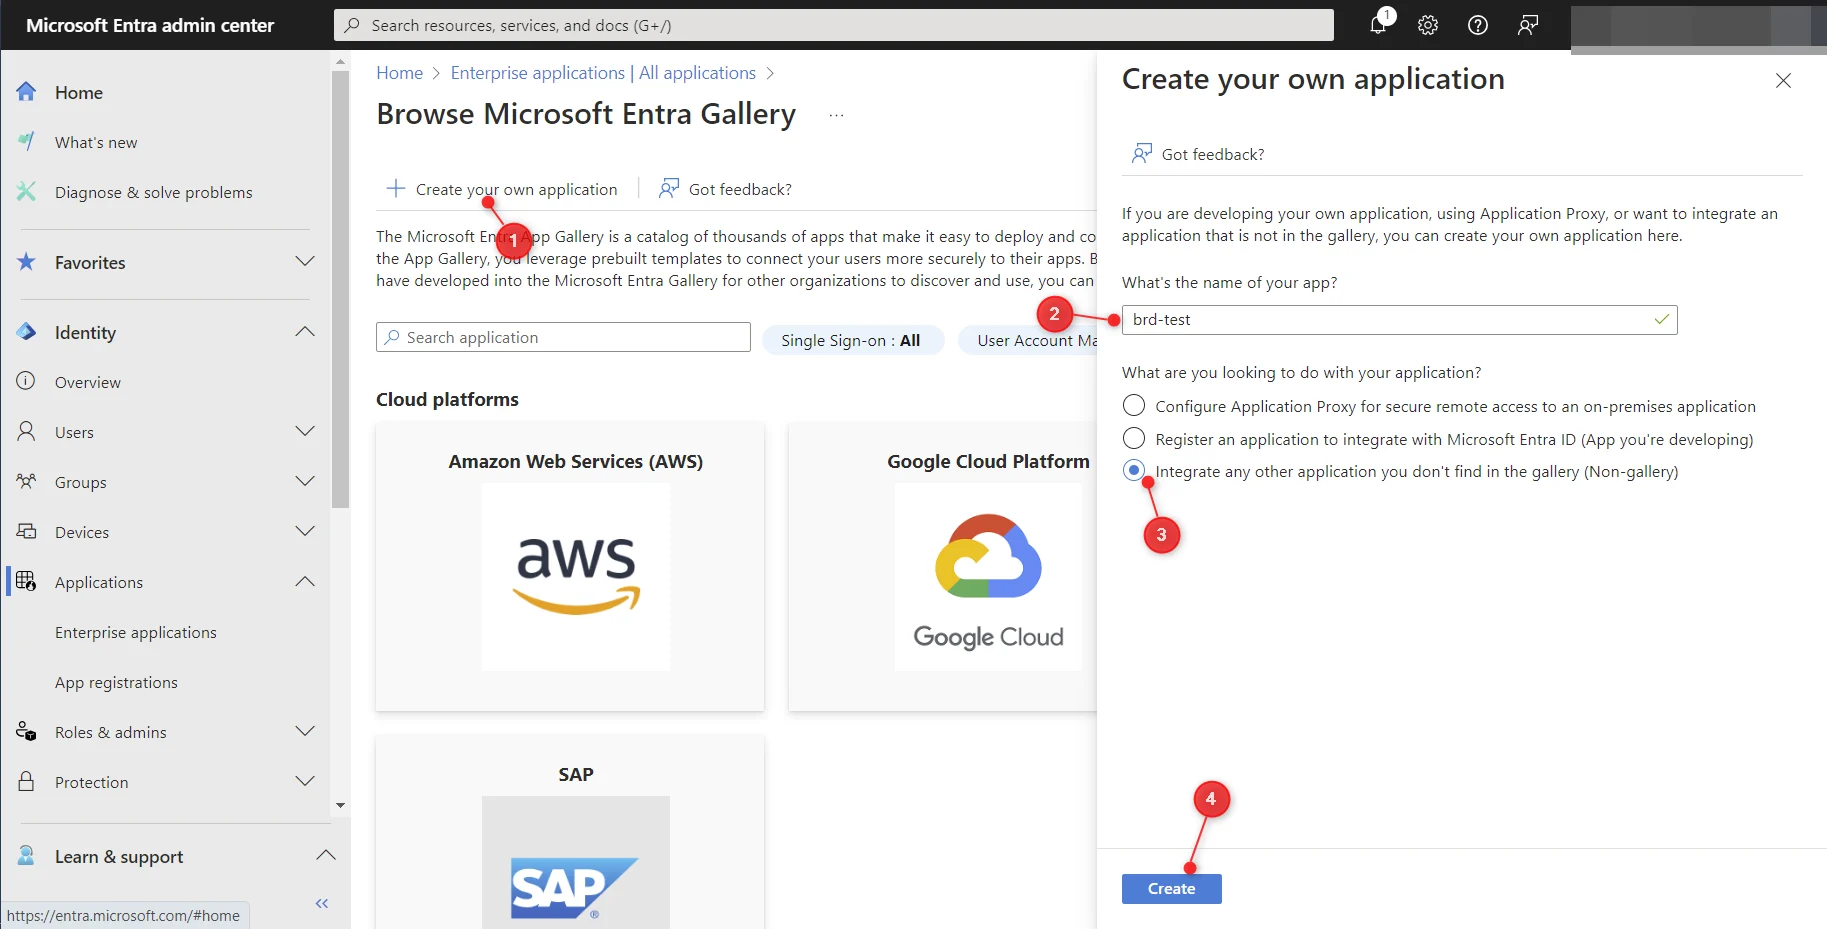
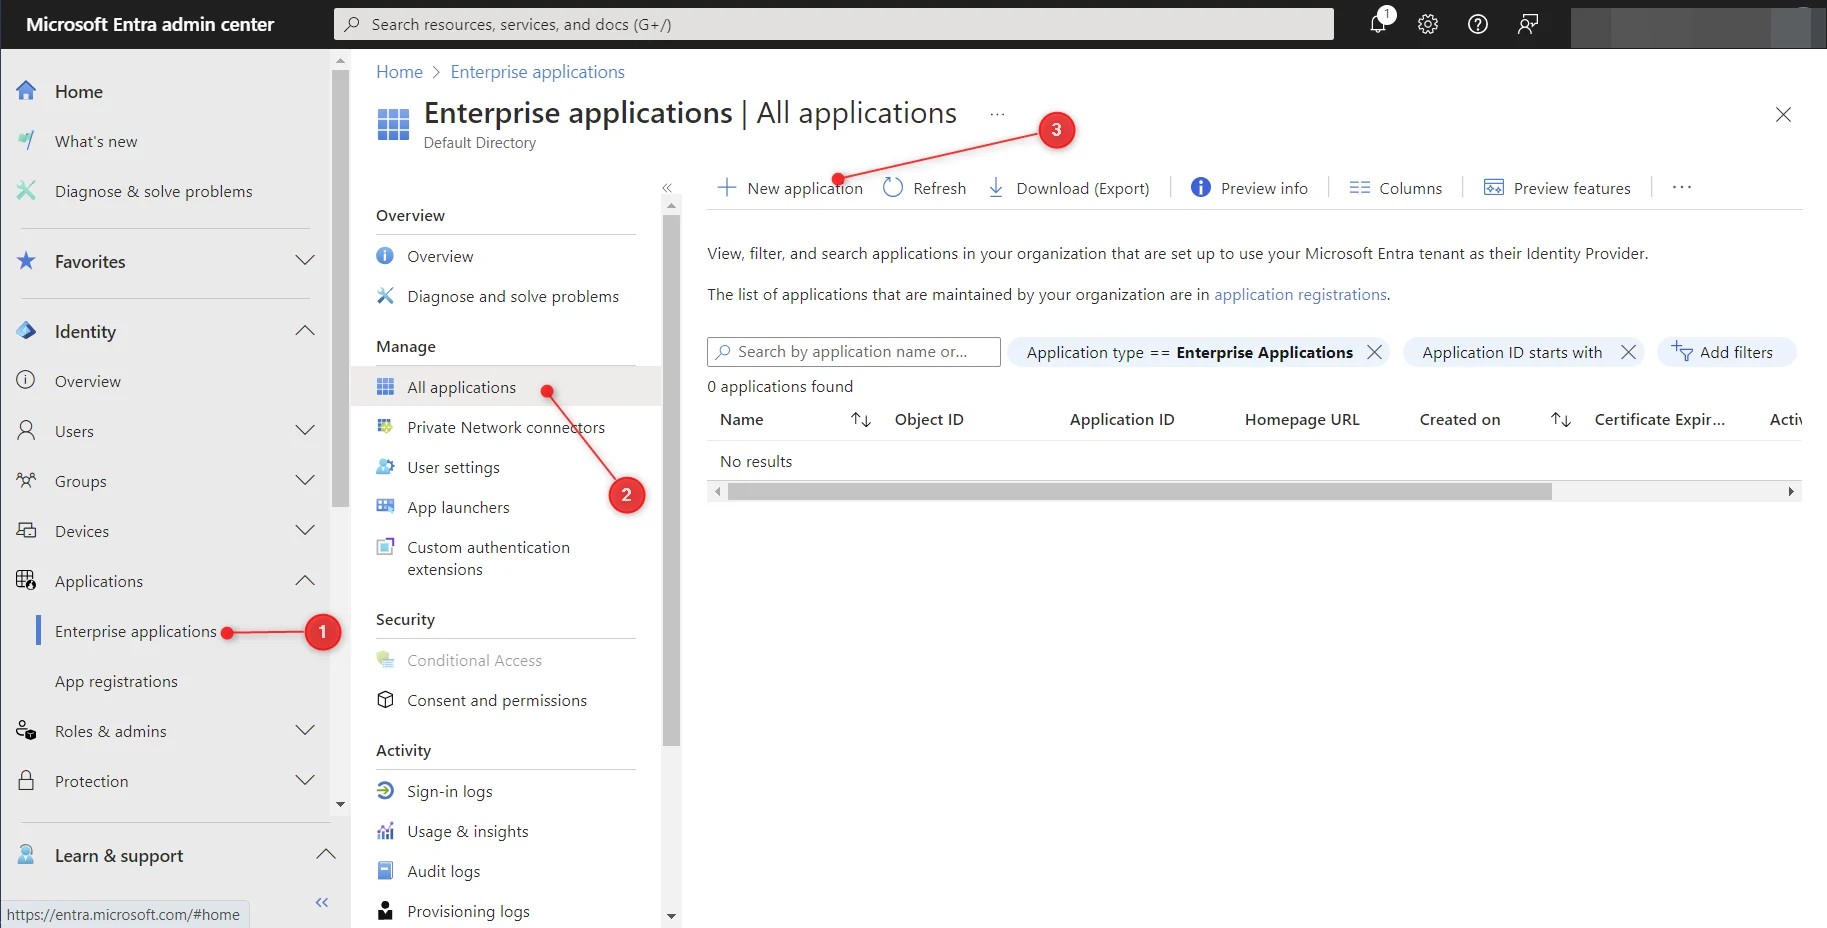 * Click “Create your own application”
* Enter name of your application
* Select “Integrate any other application you don't find in the gallery (Non-gallery)”
* Click “Create”
* Click “Create your own application”
* Enter name of your application
* Select “Integrate any other application you don't find in the gallery (Non-gallery)”
* Click “Create”
 ## How to set up SSO
**Enforced Entra SSO disables password-based login.**
When Entra SSO is enforced for your organization, password-based login and password reset emails are disabled for all users on the account. Users must sign in via Microsoft Entra.
* Entering an email address on the Bright Data login page automatically redirects the user to the Entra sign-in page.
* After a successful Entra sign-in, the user is redirected back to Bright Data.
* Password reset requests will **not** generate an email.
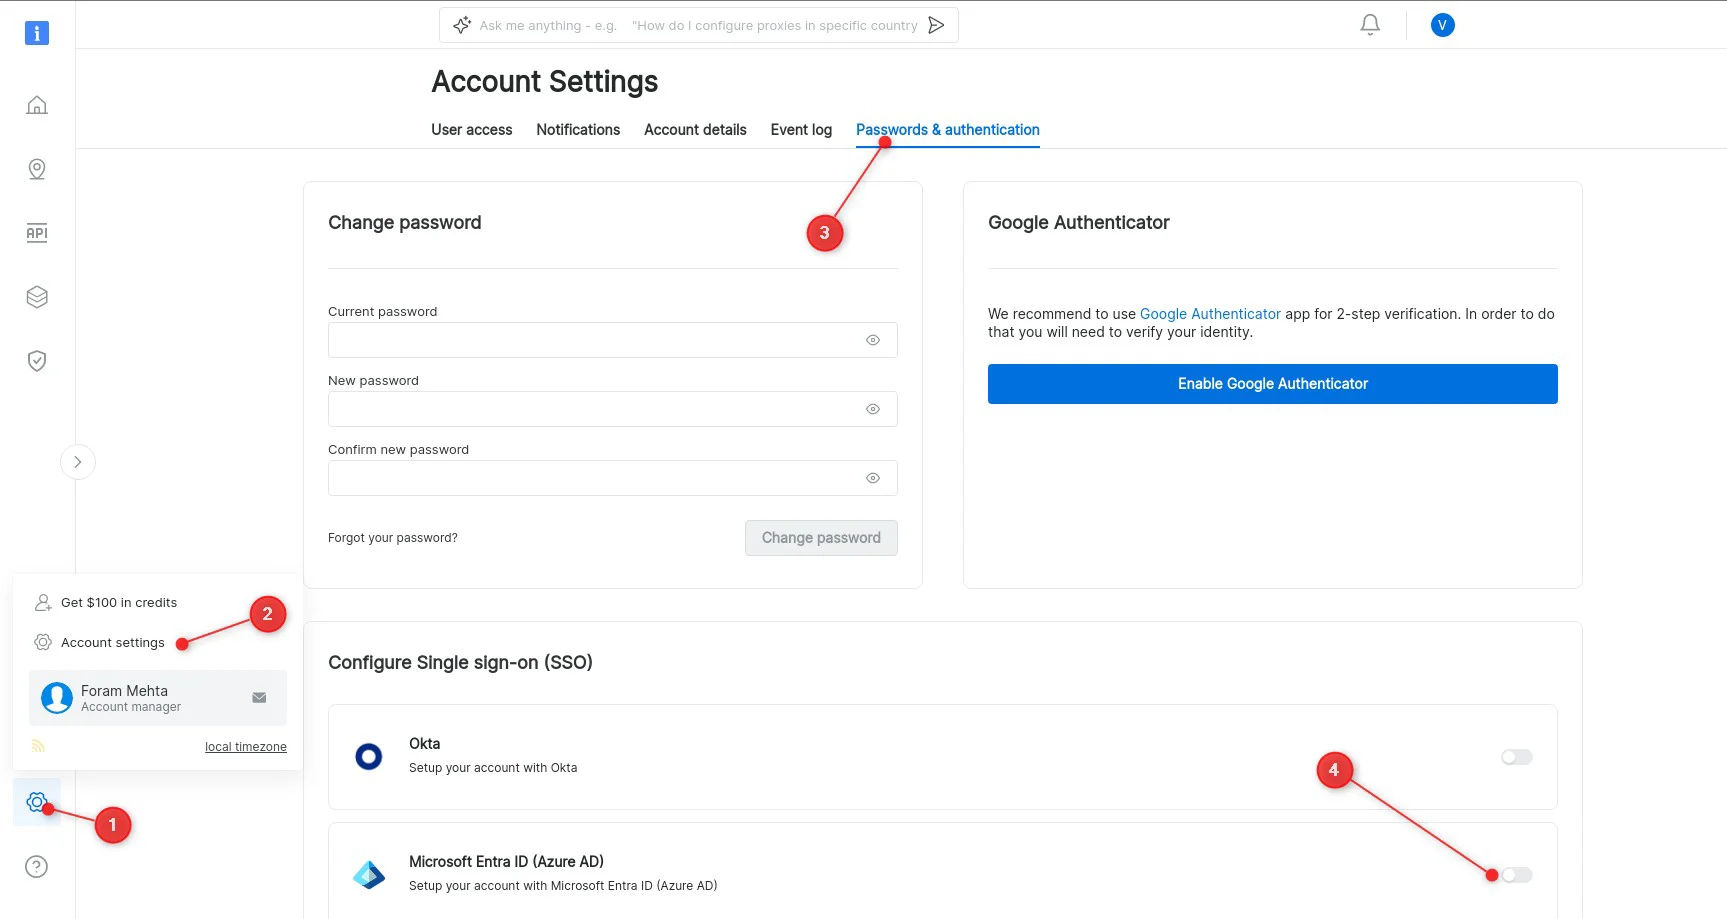
* Go to [https://brightdata.com](https://brightdata.com) and log in to your account.
* Choose Settings->Account settings->Passwords & authentication in left side menu and toggle Microsoft Entra ID (Azur AD) switch
## How to set up SSO
**Enforced Entra SSO disables password-based login.**
When Entra SSO is enforced for your organization, password-based login and password reset emails are disabled for all users on the account. Users must sign in via Microsoft Entra.
* Entering an email address on the Bright Data login page automatically redirects the user to the Entra sign-in page.
* After a successful Entra sign-in, the user is redirected back to Bright Data.
* Password reset requests will **not** generate an email.
* Go to [https://brightdata.com](https://brightdata.com) and log in to your account.
* Choose Settings->Account settings->Passwords & authentication in left side menu and toggle Microsoft Entra ID (Azur AD) switch
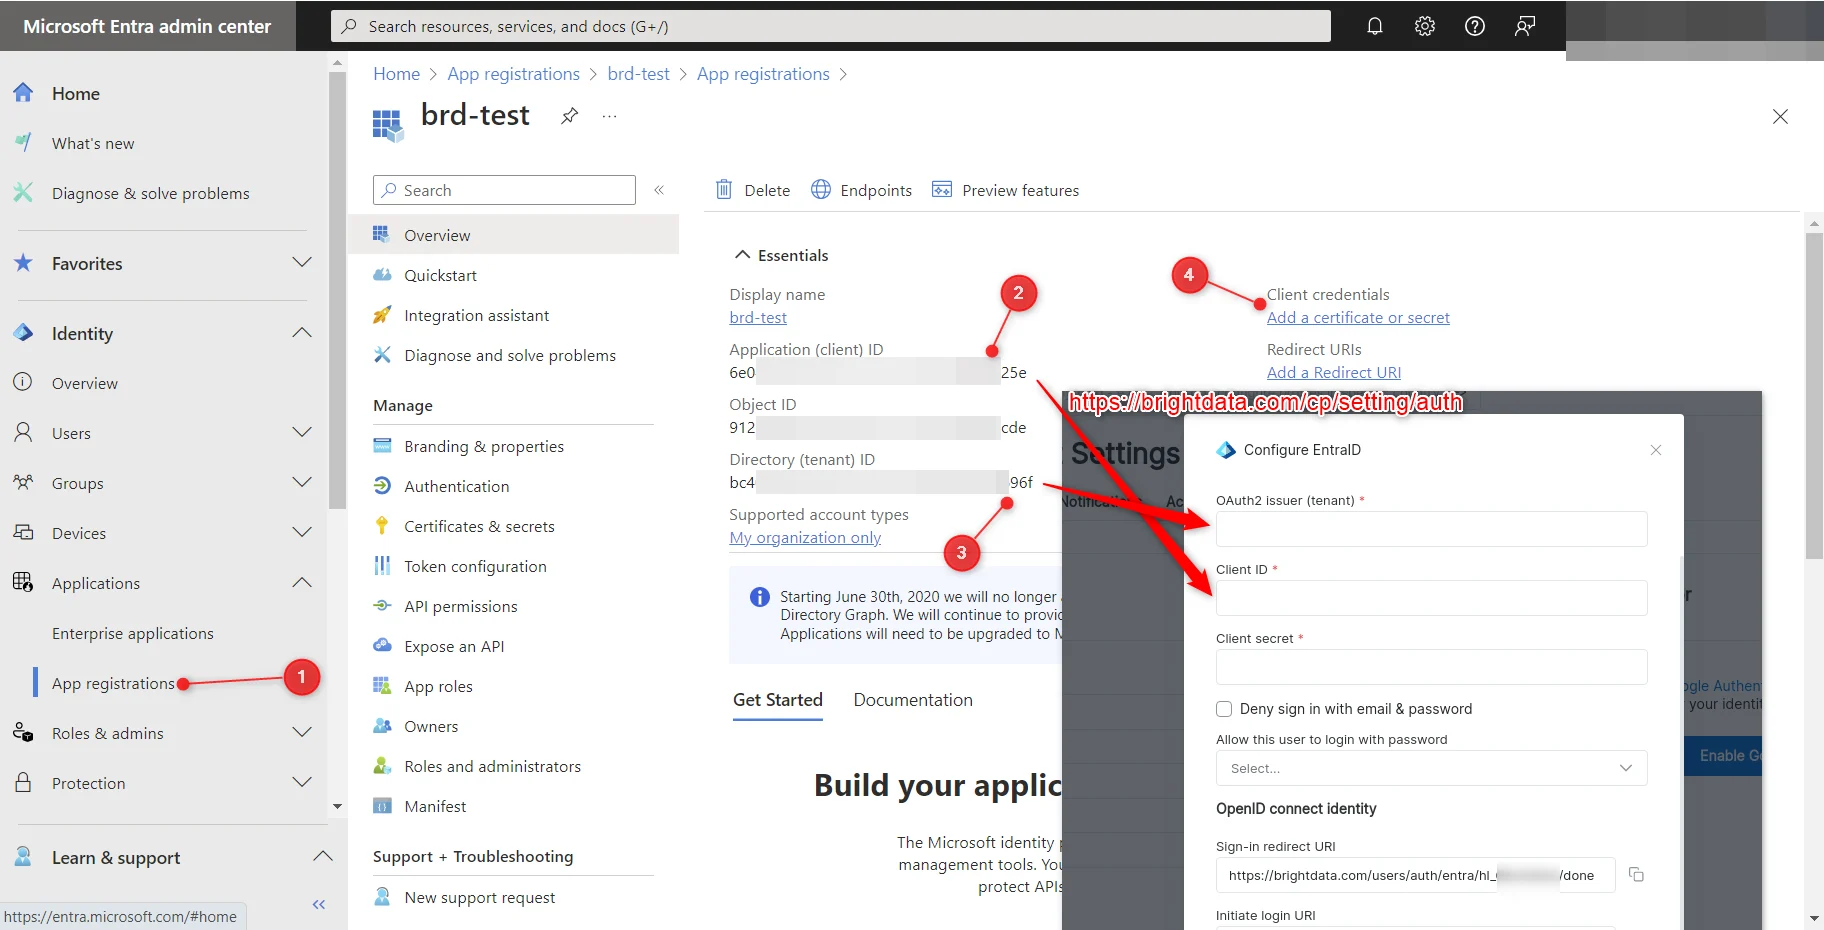
 * From “App registrations” view select your application.
* Copy “Application (client) ID” to “Client ID”
* Copy “Directory (tenant) ID” to “OAuth2 issuer (tenant)”
* Go to “Add a certificate or secret”
* From “App registrations” view select your application.
* Copy “Application (client) ID” to “Client ID”
* Copy “Directory (tenant) ID” to “OAuth2 issuer (tenant)”
* Go to “Add a certificate or secret”
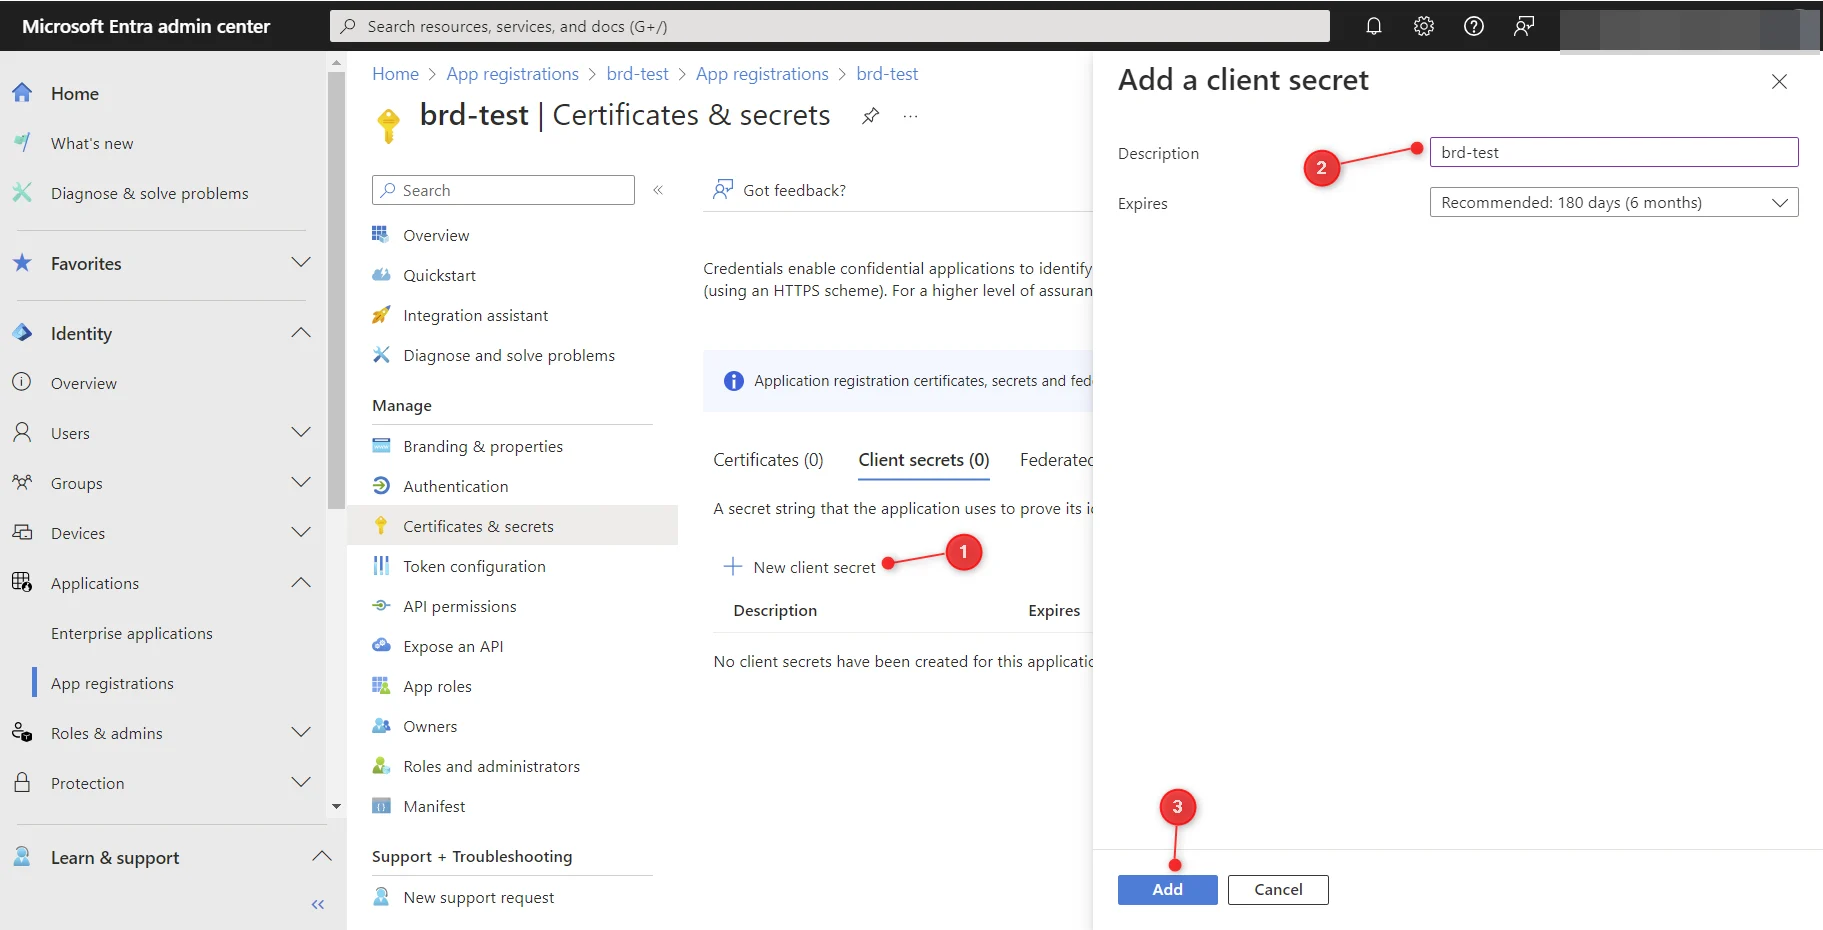
 * At secrets screen click “New client secret”
* Fill Description
* Click “Add”
* At secrets screen click “New client secret”
* Fill Description
* Click “Add”
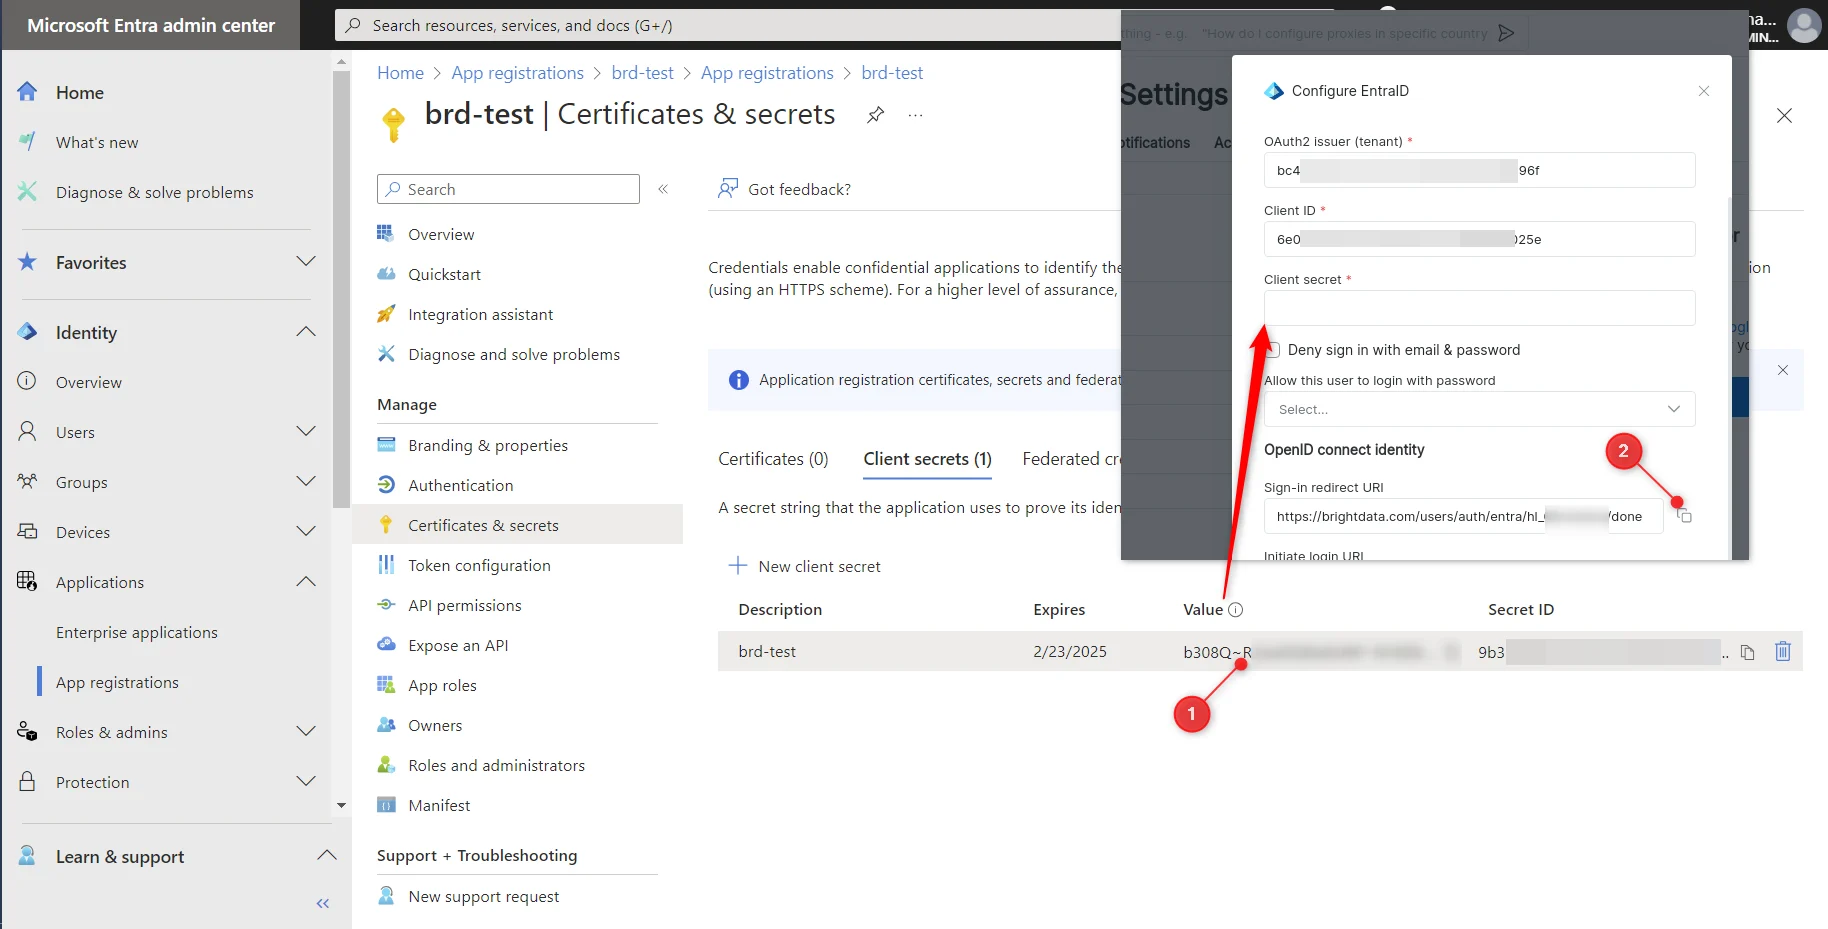
 * Once secret is created copy secret value to “Client secret”.
* Copy “Sign-in redirect URI” to be used at next step
* Once secret is created copy secret value to “Client secret”.
* Copy “Sign-in redirect URI” to be used at next step
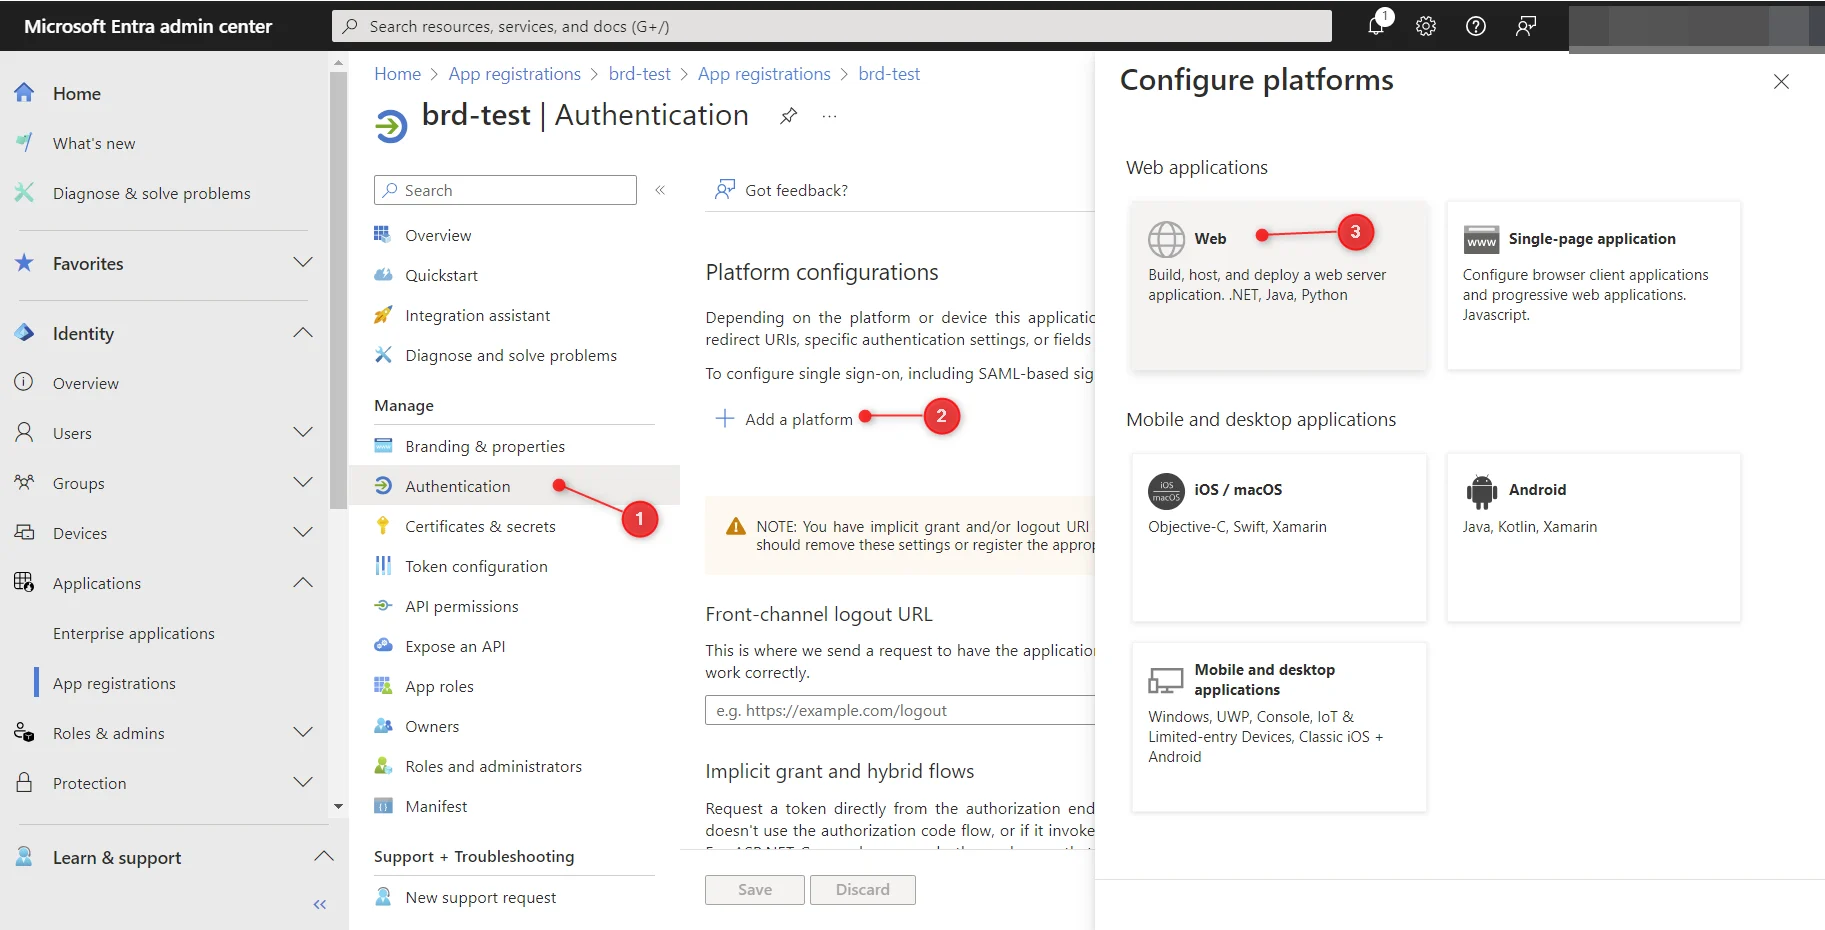
 * At “Authentication” screen click “Add platform” and select “Web”
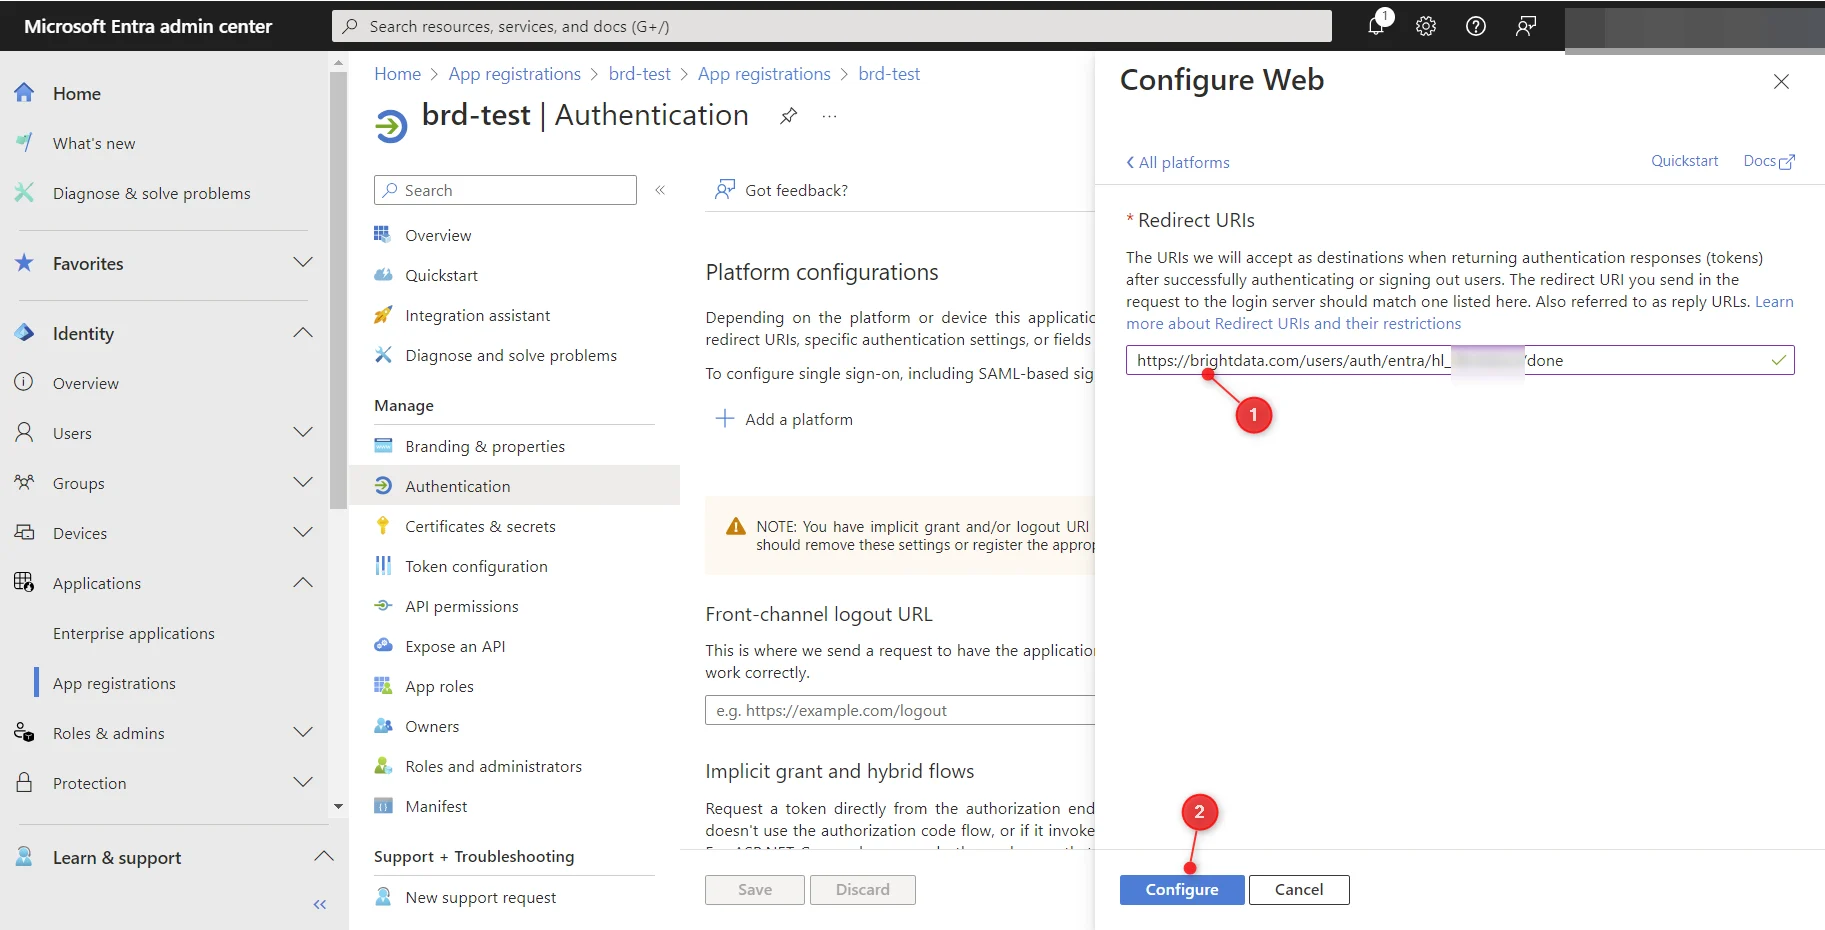
 * Paste previously copied “Sign-in redirect URI” to the “Redirect URIs” and save settings by clicking “Configure”:
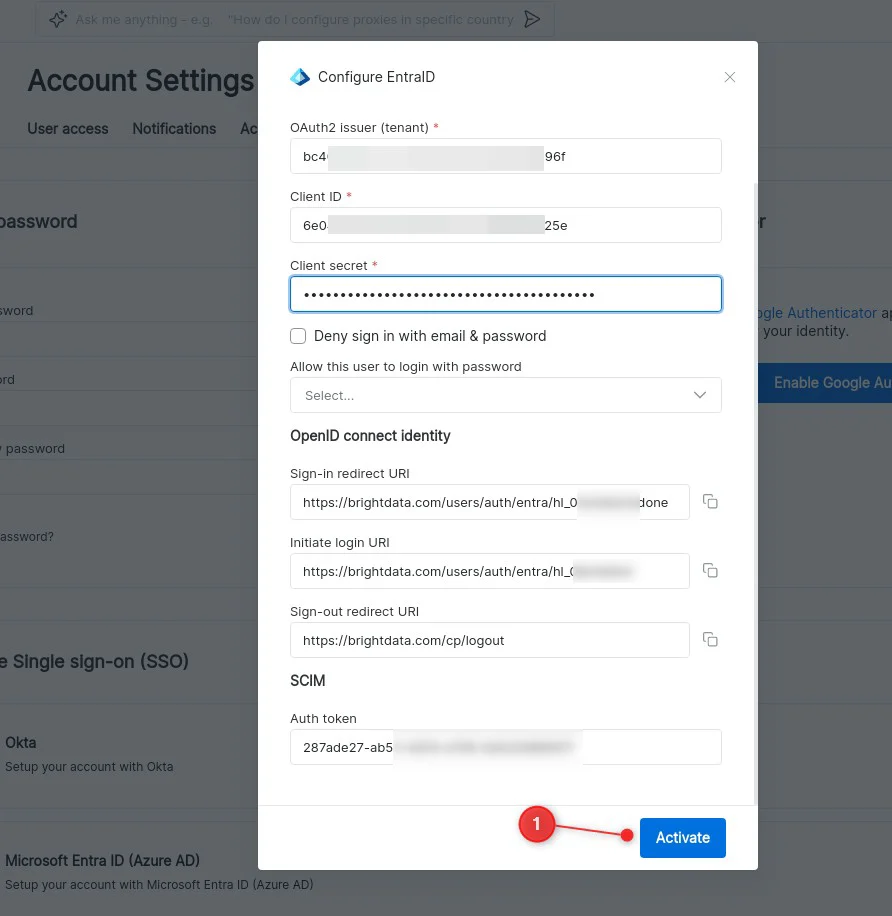
 * Activate EntraID integration at BrighData control panel and test login:
 ## Setup SCIM provisioning
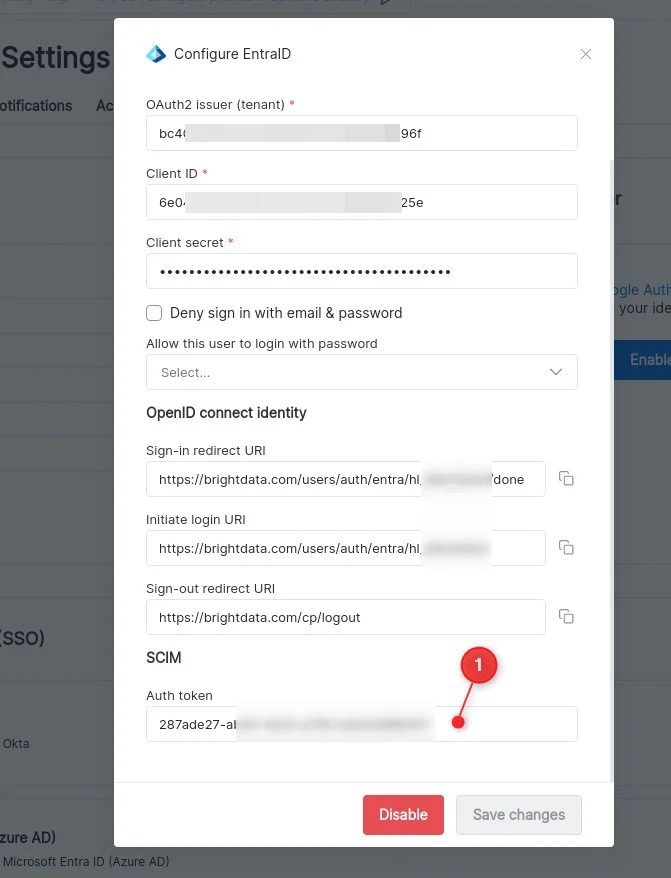
* Copy “Auth token” from SCIM section of BrightData EntraID settings:
## Setup SCIM provisioning
* Copy “Auth token” from SCIM section of BrightData EntraID settings:
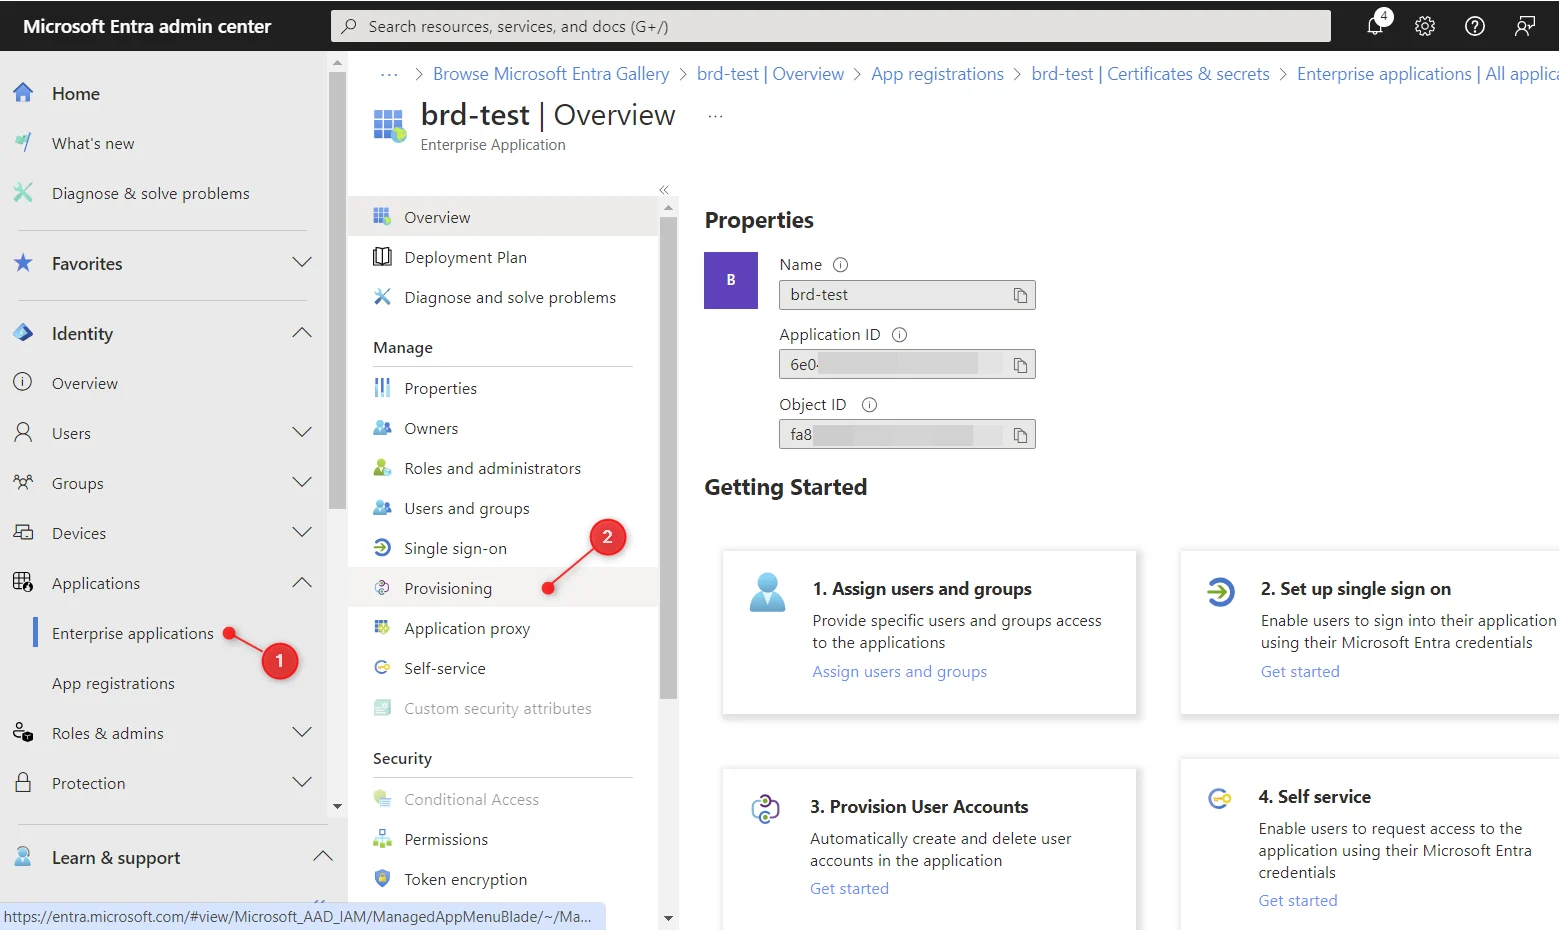
 * Select your application from “Enterprise Applications” view and go to “Provisioning” settings:
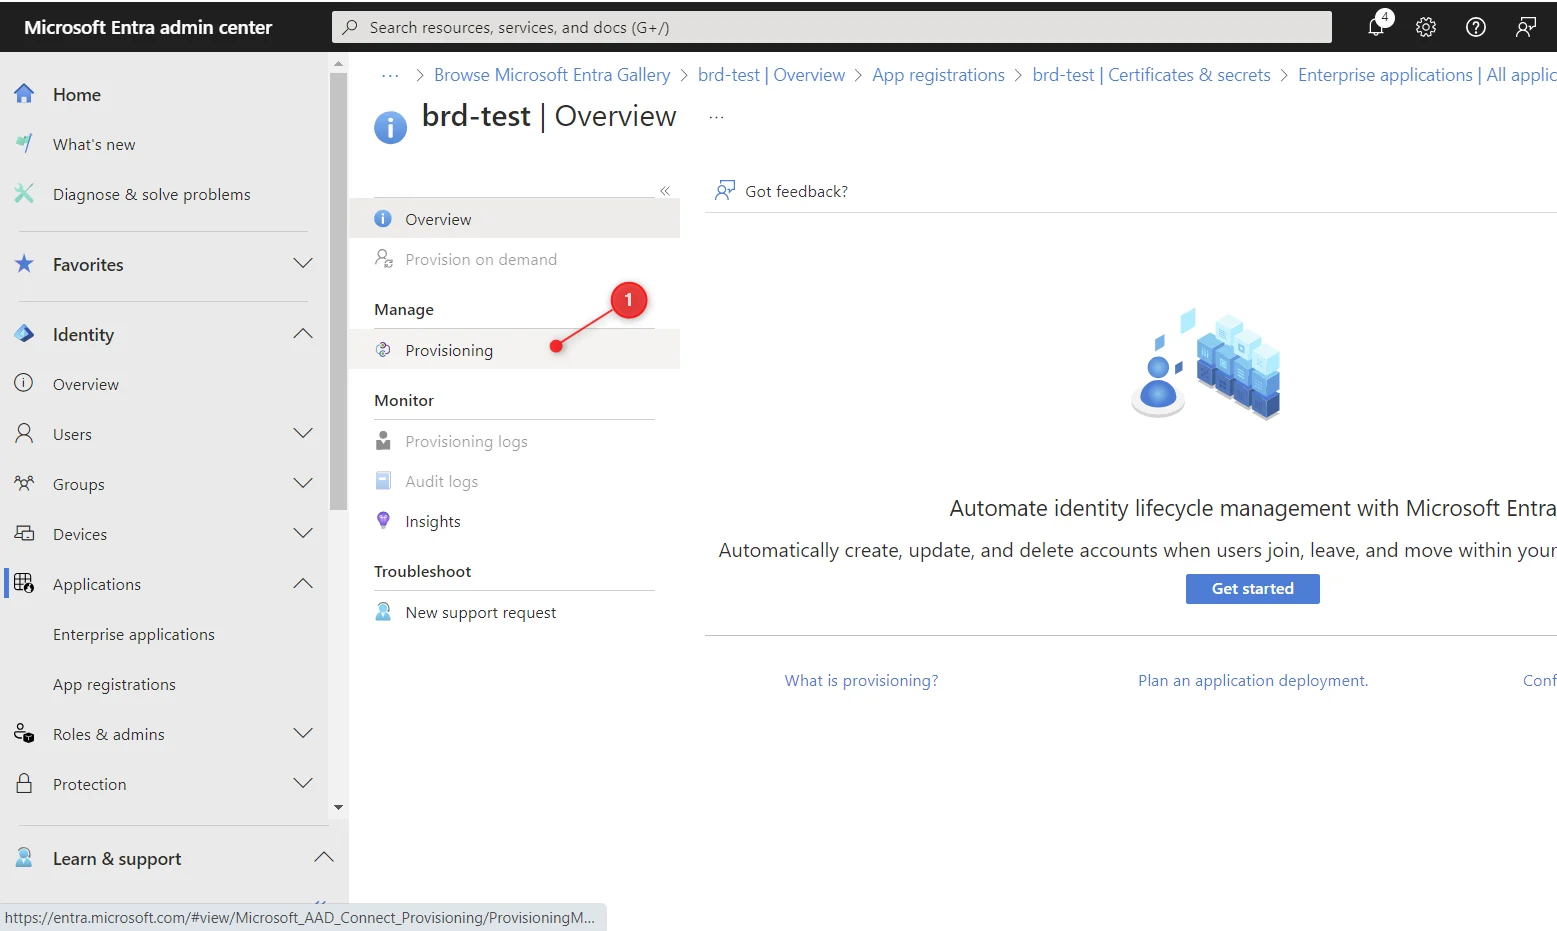
 * Select “Provisioning” under “Manage” menu:
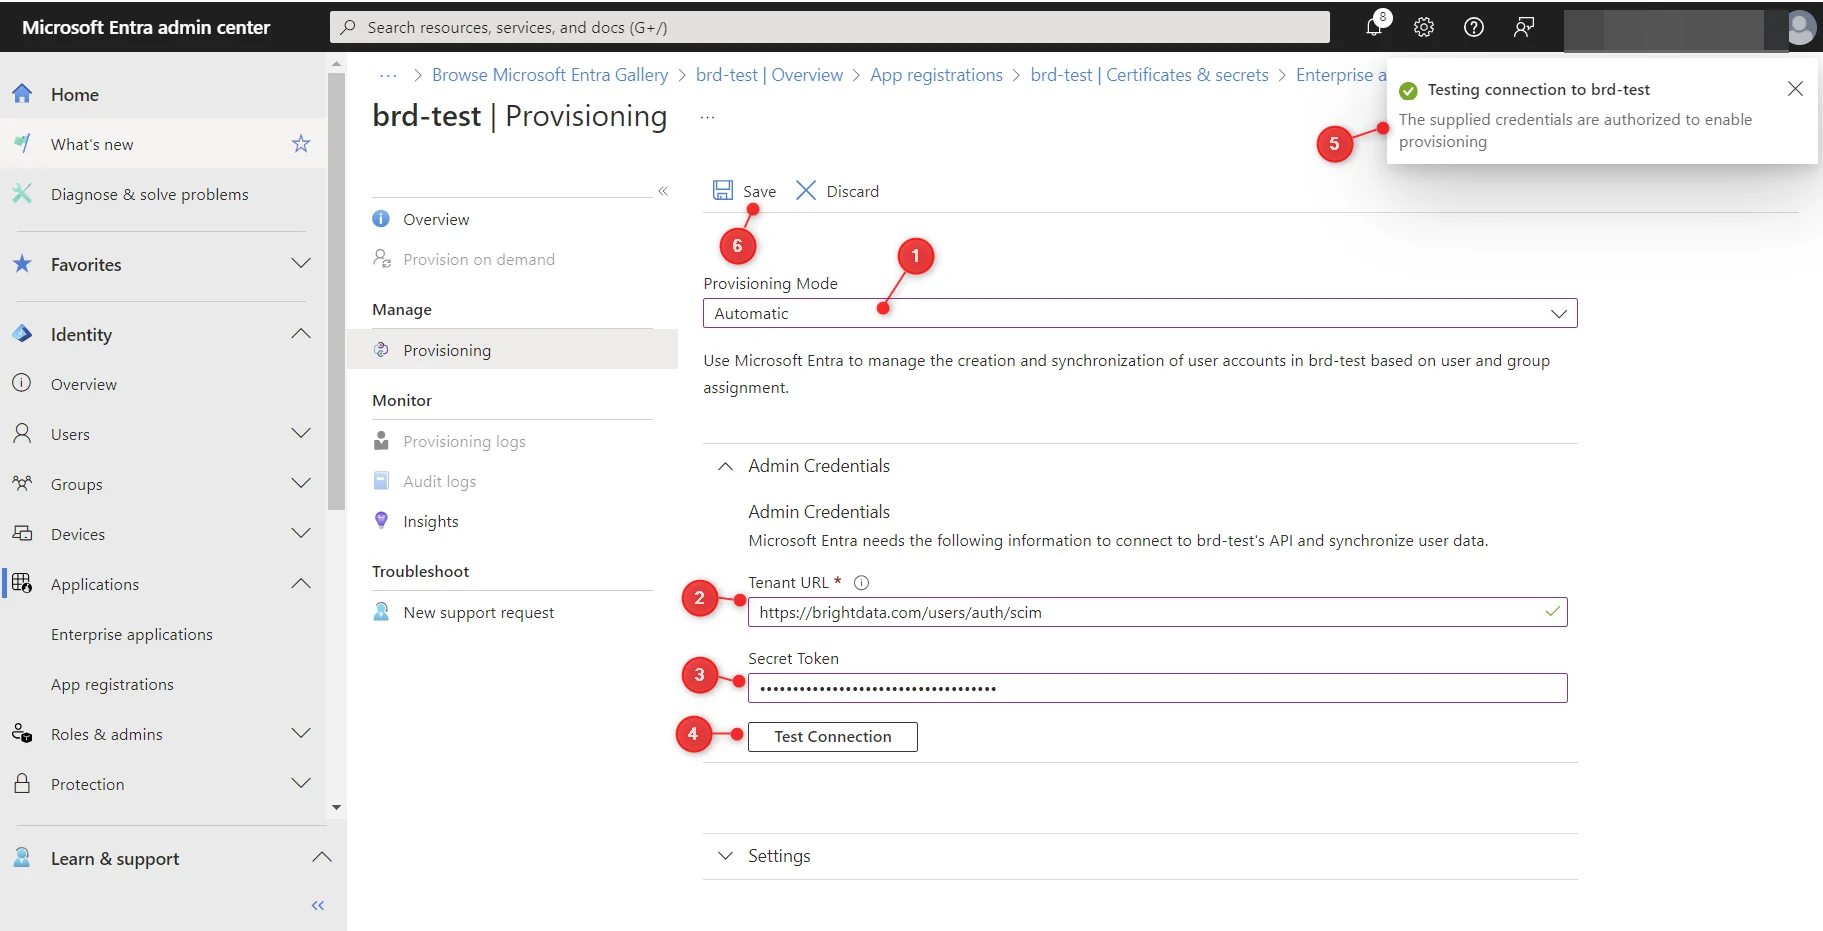
 * Select “Automatic” Provisioning Mode
* Fill “Tenant URL” with [https://brightdata.com/users/auth/scim](https://brightdata.com/users/auth/scim) value
* Fill “Secret Token” with previously copied value from BrightData control panel settings
* Test Connection. You should see successful message in top right corner
Save Settings
* Select “Automatic” Provisioning Mode
* Fill “Tenant URL” with [https://brightdata.com/users/auth/scim](https://brightdata.com/users/auth/scim) value
* Fill “Secret Token” with previously copied value from BrightData control panel settings
* Test Connection. You should see successful message in top right corner
Save Settings
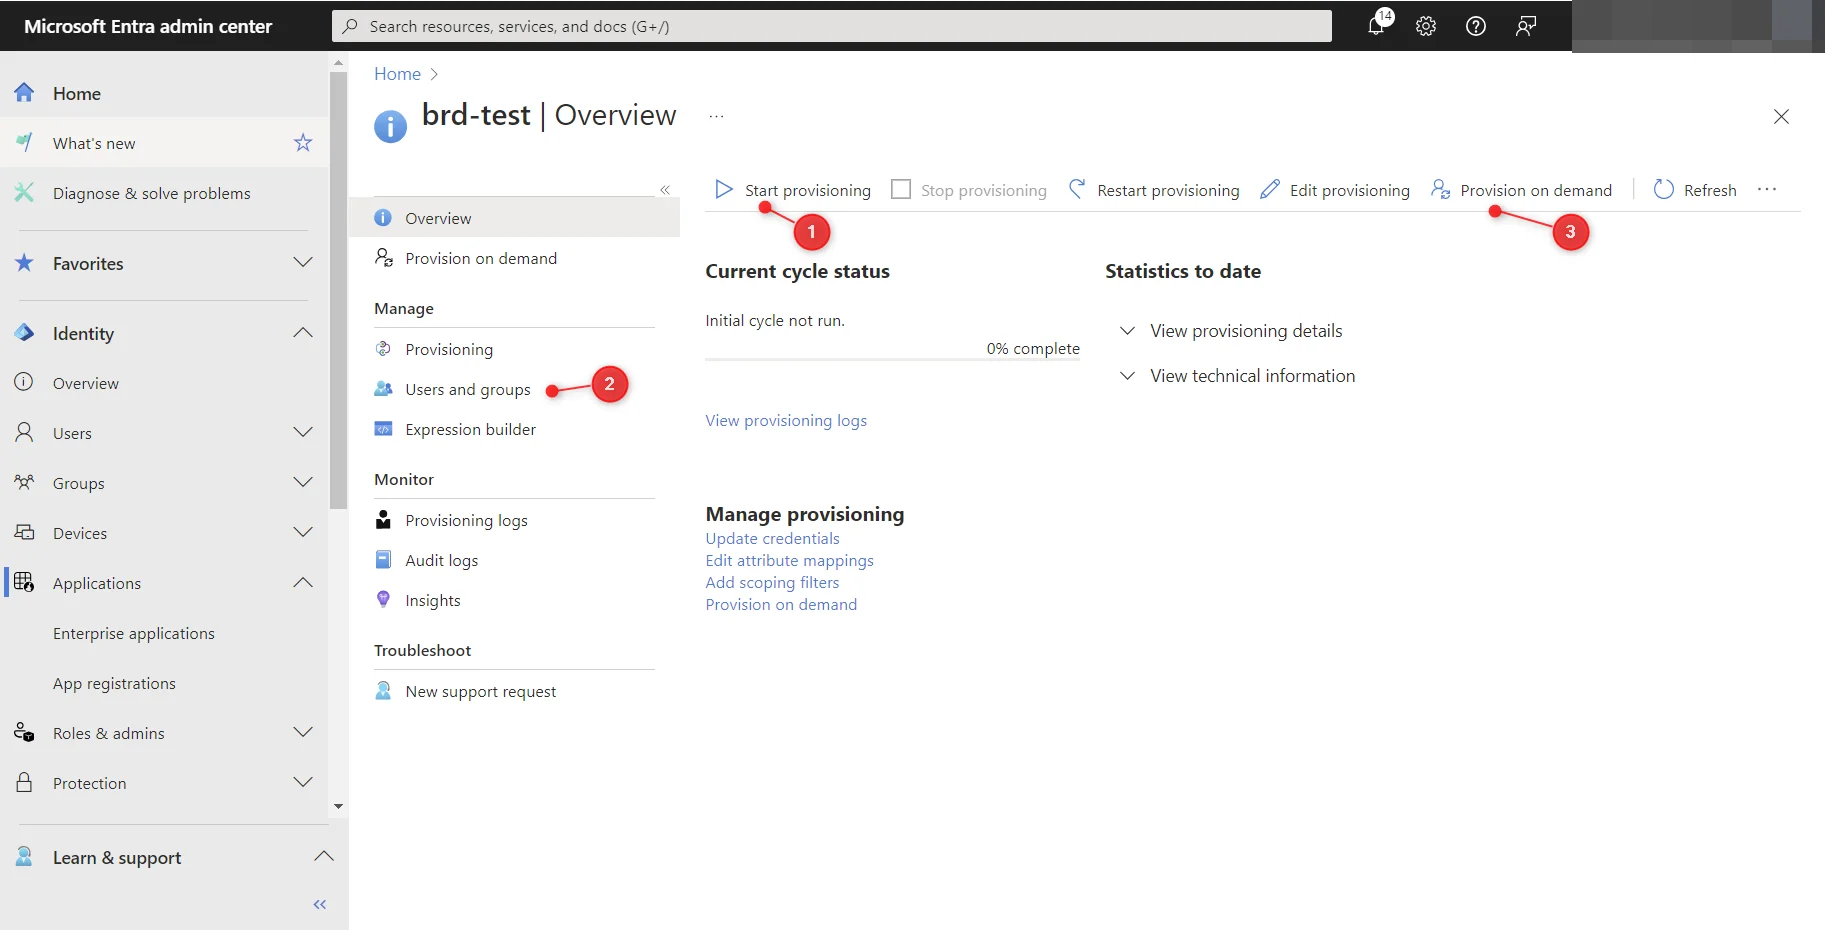
 * Return to “Overview” tab and click “Start provisioning”.
* You can test provisioning at “Provision on demand” page, but first assign your users to BrightData application at “Users and groups” page:
* Return to “Overview” tab and click “Start provisioning”.
* You can test provisioning at “Provision on demand” page, but first assign your users to BrightData application at “Users and groups” page:
 ## Troubleshooting
If your organization has enabled **enforced Entra SSO**, password reset emails are not sent, because password-based authentication is disabled on accounts with enforced SSO.
To sign in:
1. Go to the [Bright Data sign-in page](https://brightdata.com/cp).
2. Enter the user's email address.
3. The user will be automatically redirected to the Microsoft Entra sign-in page.
4. After a successful Entra sign-in, the user is redirected back to Bright Data.
If access issues persist, contact your organization's IT / Entra administrator. They manage the Entra SSO configuration on your company's side.
This is expected behavior when Entra SSO is enforced. The Bright Data login page detects the email domain associated with your organization's Entra tenant and redirects the user to your configured Microsoft Entra sign-in page.
## Troubleshooting
If your organization has enabled **enforced Entra SSO**, password reset emails are not sent, because password-based authentication is disabled on accounts with enforced SSO.
To sign in:
1. Go to the [Bright Data sign-in page](https://brightdata.com/cp).
2. Enter the user's email address.
3. The user will be automatically redirected to the Microsoft Entra sign-in page.
4. After a successful Entra sign-in, the user is redirected back to Bright Data.
If access issues persist, contact your organization's IT / Entra administrator. They manage the Entra SSO configuration on your company's side.
This is expected behavior when Entra SSO is enforced. The Bright Data login page detects the email domain associated with your organization's Entra tenant and redirects the user to your configured Microsoft Entra sign-in page.