> ## Documentation Index
> Fetch the complete documentation index at: https://docs.brightdata.com/llms.txt
> Use this file to discover all available pages before exploring further.
# Okta SSO setup with Bright Data
> Step-by-step guide to configure Okta OIDC SSO with Bright Data in 5 steps, plus SSO technical reference for enterprise security questionnaires.
**Requirements**
* An Okta organization account with admin permission
* A Bright Data account with admin permission
**Enforced Okta SSO disables password-based login.**
When Okta SSO is enforced for your organization, password-based login and password reset emails are disabled for all users on the account. Users must sign in via Okta. Contact your IT / Okta administrator if access issues arise.
**Steps:**
1. On your Okta admin dashboard, choose '**Applications > Applications**'
```sh theme={null}
https://[your_domain]-admin.okta.com/admin/apps/active
```
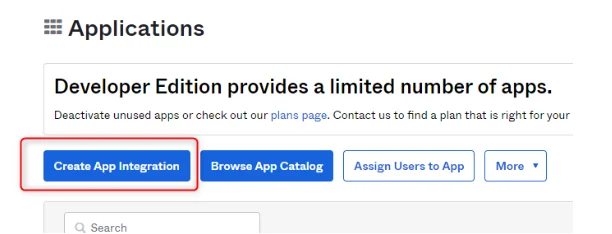
2. Click '**Create App Integration**'
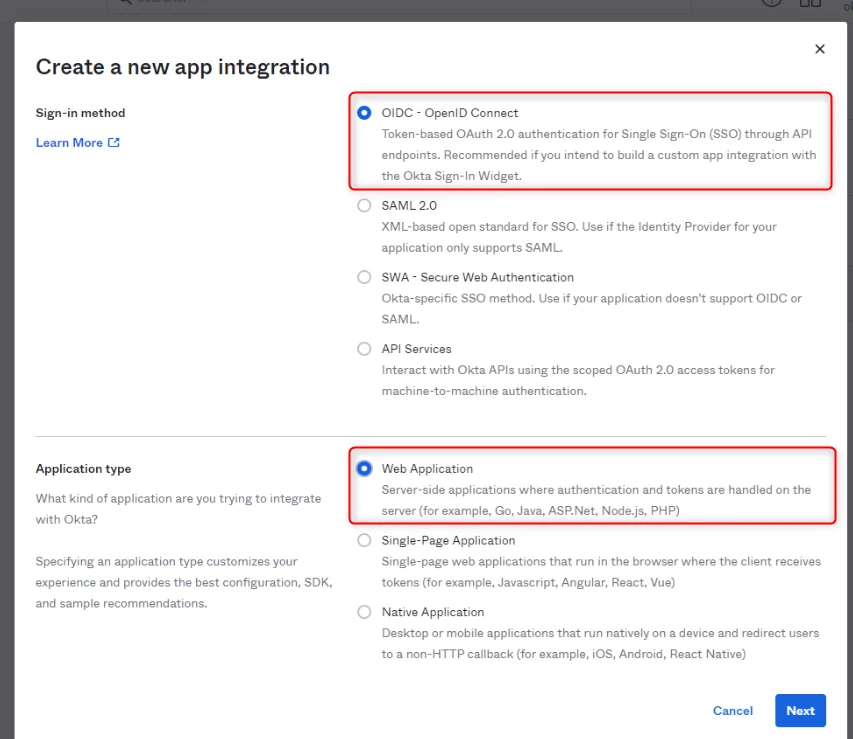
 3. Select '**OIDC - OpenID Connect**' as the Sign-in method,
4. Select'**Web Application**' as the Application type and click '**Next**'
3. Select '**OIDC - OpenID Connect**' as the Sign-in method,
4. Select'**Web Application**' as the Application type and click '**Next**'
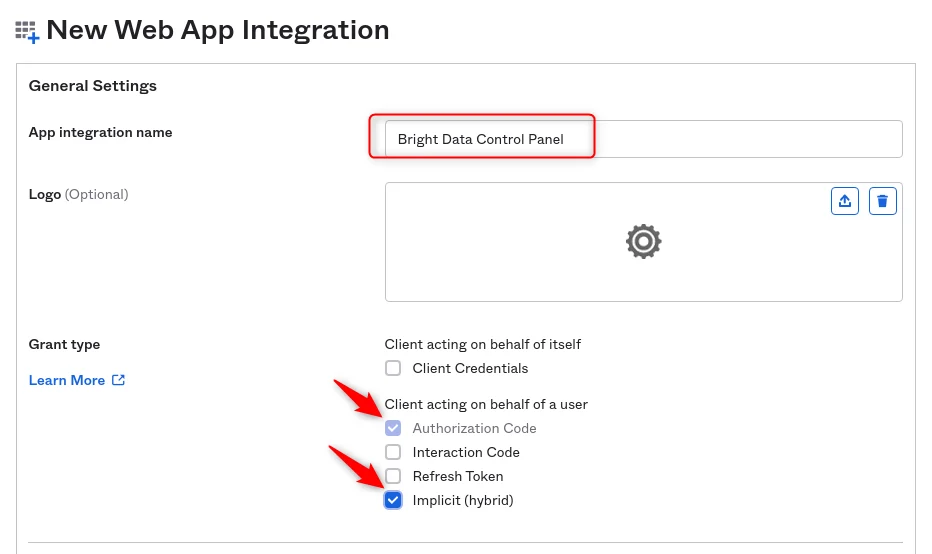
 5. At this point you should be redirected to a new web app integration page. Here you can name your app integration (we recommend to use "**Bright Data Control Panel**" name).
6. At ‘Grant type’ select **Implicit** along with **Authorization Code**
5. At this point you should be redirected to a new web app integration page. Here you can name your app integration (we recommend to use "**Bright Data Control Panel**" name).
6. At ‘Grant type’ select **Implicit** along with **Authorization Code**
 7. Go to Bright Data [Control Panel](https://brightdata.com/cp/setting)
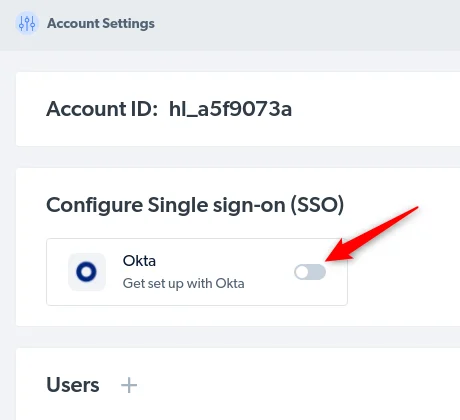
8. Open OKTA configuration dialog
7. Go to Bright Data [Control Panel](https://brightdata.com/cp/setting)
8. Open OKTA configuration dialog
 9. Copy **"Sign-in redirect URI"**
**
9. Copy **"Sign-in redirect URI"**
** **
10. Paste it to according field in New App setup in OKTA
**
10. Paste it to according field in New App setup in OKTA
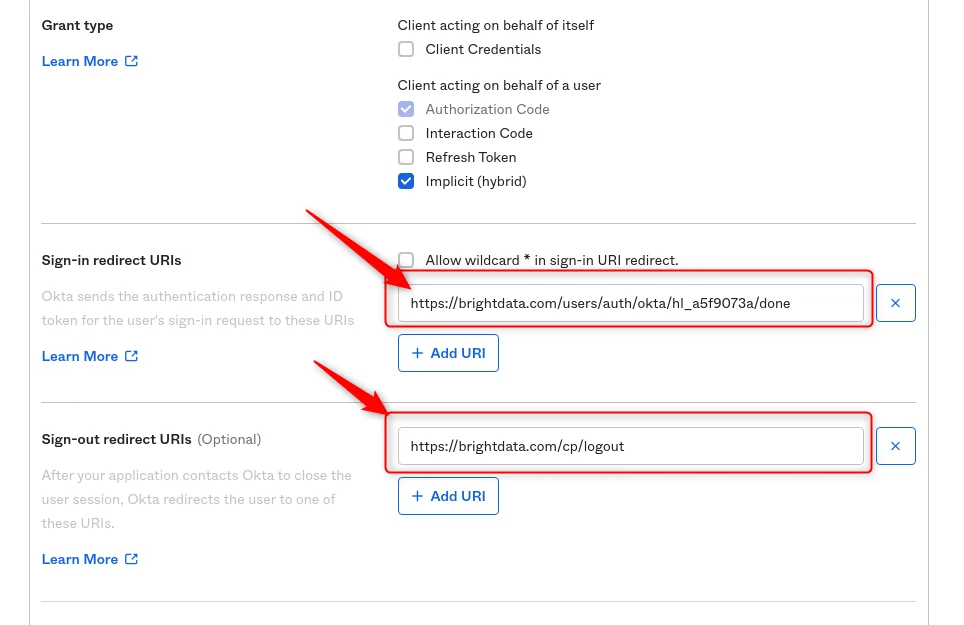 11. Repeat the same for **"Sign-out URI"**
12. At ‘Assignments’, select an access level as you want
11. Repeat the same for **"Sign-out URI"**
12. At ‘Assignments’, select an access level as you want
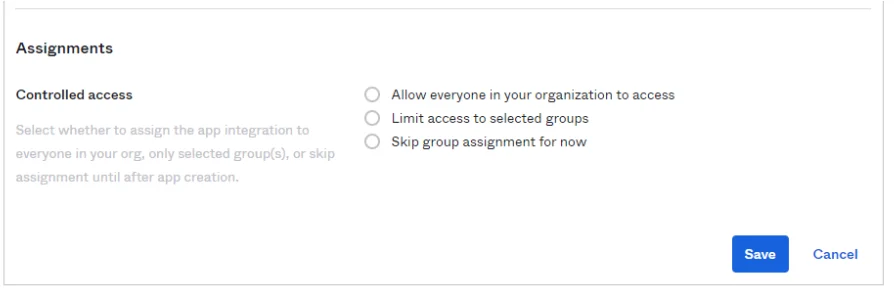 13. Click '**Save**'
14. Now, you should land on your new app integration settings page.
Copy your **Client ID**, **Client Secret**, and **Okta domain** to OKTA setup dialog in your Bright Data Control Panel.
13. Click '**Save**'
14. Now, you should land on your new app integration settings page.
Copy your **Client ID**, **Client Secret**, and **Okta domain** to OKTA setup dialog in your Bright Data Control Panel.
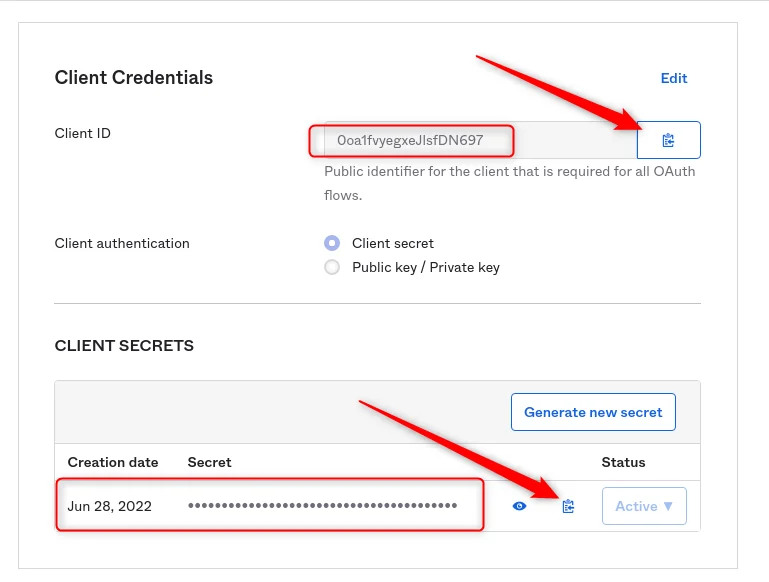
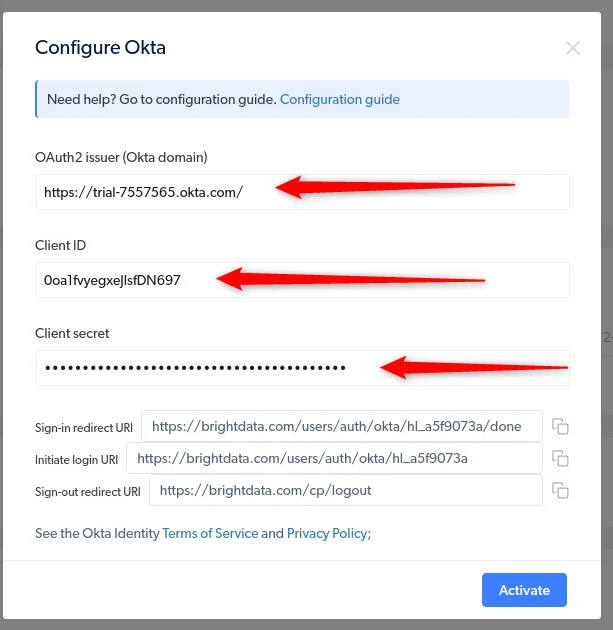 15. Click **"Activate"**.
Skip step 16 if you selected "Allow everyone to access"
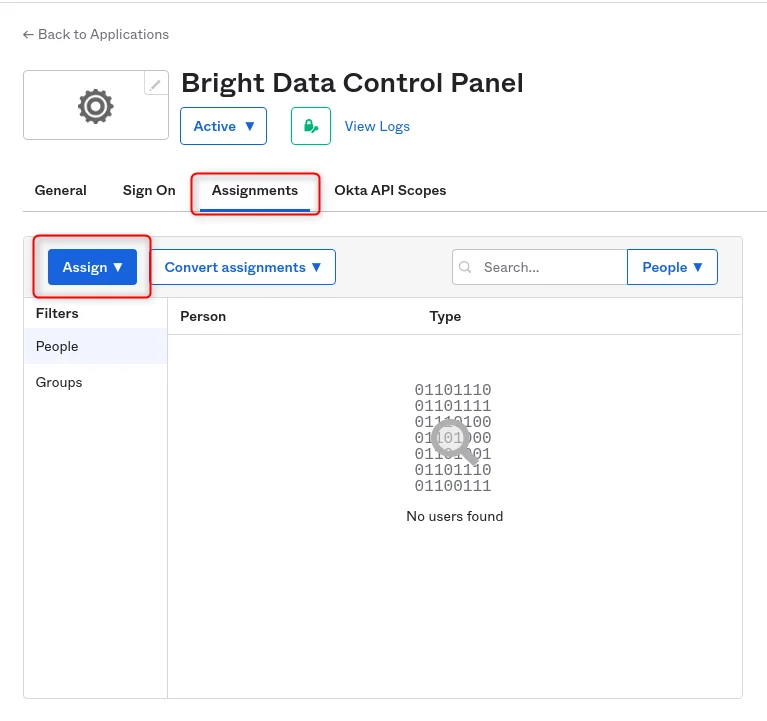
16. Go to **"Assignments"** tab and assign users allowed to use this integration
15. Click **"Activate"**.
Skip step 16 if you selected "Allow everyone to access"
16. Go to **"Assignments"** tab and assign users allowed to use this integration
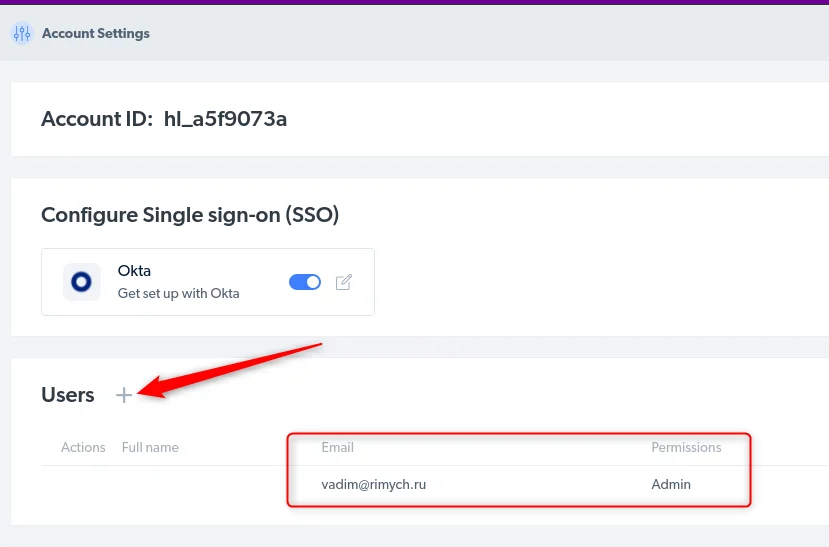
 17. Go to Bright Data Settings page and make sure all required users presented.
We're working on users provisioning support, at the moment - you should manage it manually.
17. Go to Bright Data Settings page and make sure all required users presented.
We're working on users provisioning support, at the moment - you should manage it manually.
 ***The following steps are optional. They are for enabling your users to launch authentication from their dashboard or the Okta Chrome extension.***
18. Scroll down to ‘General Settings’ and click **Edit**
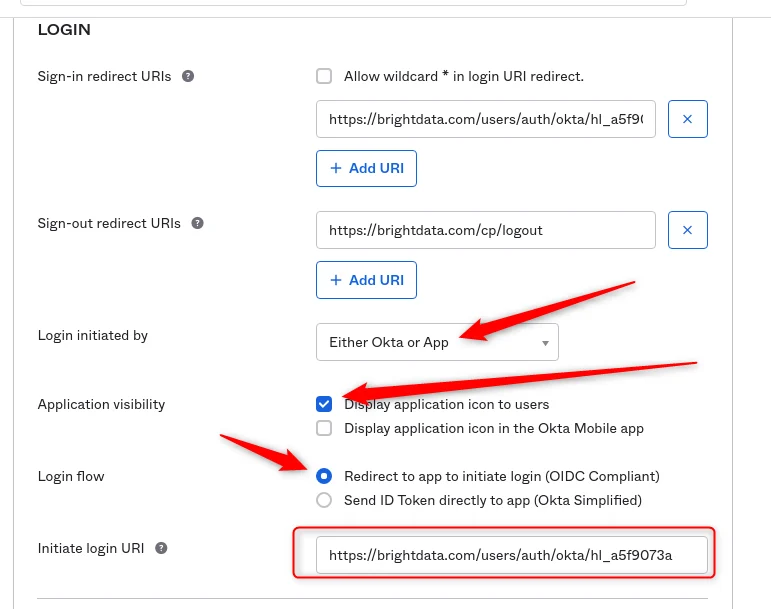
19. Set these settings:
* Login initiated by: **Either Okta or App**
* Application visibility: **Display application icon to users**
* Login flow: **Redirect to app to initiate login (OIDC Compliant)**
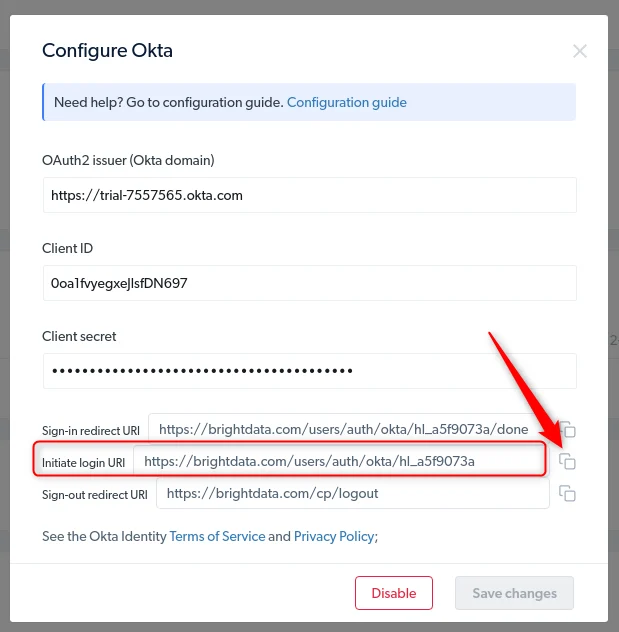
* Copy Initiate login URI from Control Panel
***The following steps are optional. They are for enabling your users to launch authentication from their dashboard or the Okta Chrome extension.***
18. Scroll down to ‘General Settings’ and click **Edit**
19. Set these settings:
* Login initiated by: **Either Okta or App**
* Application visibility: **Display application icon to users**
* Login flow: **Redirect to app to initiate login (OIDC Compliant)**
* Copy Initiate login URI from Control Panel
 20. Save changes. **Now the integration is ready to work.**
**Notes**
* Okta Domain should be the one that appears in your app integration settings (**yourcompany.okta.com**), NOT the one you are seeing as an admin (yourcompany-admin.okta.com)
* Make sure the **Credentials** provided to Bright Data are correct, we cannot check them on our side.
- **Sign-in Redirect URI** is a must in order to make the SSO feature work correctly\
- **Initiate login URI** is needed if the you wants to be able to use the feature from the Okta Chrome extension or the Okta dashboard
***
## SSO technical reference
This section is for enterprise security teams completing vendor SSO questionnaires.
### Which SSO protocol is supported
Bright Data supports SSO via **OpenID Connect (OIDC) only**. SAML 2.0 is not supported. There is no SAML metadata XML, Entity ID, or ACS URL.
### Supported identity providers
* Okta
* Microsoft Entra ID (Azure AD)
* Google Workspace
### Which OIDC parameters to configure
| Parameter | Value |
| --------------- | ------------------------- |
| Protocol | OpenID Connect (OIDC) |
| User identifier | `email` claim |
| Required scopes | `profile email` |
| Required claims | `email` |
| Optional claims | `givenName`, `familyName` |
### How account provisioning works
| Identity provider | Provisioning method |
| ------------------ | ------------------------------------------------------------------------------------------------------------------------------------------------------------------------------------------------------------------------------------------------------------------------------------------ |
| Okta | Manual. Add users in the Bright Data Control Panel. User record is created automatically on first sign-in. |
| Microsoft Entra ID | Automatic via SCIM. |
| Google Workspace | Manual. Add users in the Bright Data Control Panel. User record is created automatically on first sign-in. The OIDC `hd` claim enforces the configured Workspace Domain. See [Google Workspace SSO setup](/general/authentication/How_to_set_up_SSO_with_Google_Workspace_in_Bright_Data). |
### Other SSO details
* Password logins can be disabled entirely.
* Access is controlled by users added to the account, not by email domain.
* Different user roles are available to restrict access per user.
### Google OAuth 2.0
Bright Data also supports login via Google OAuth 2.0.
| Parameter | Value |
| -------------------- | ------------------------------------------------------------------------------------------------------------------------------------------------ |
| Required scopes | `https://www.googleapis.com/auth/userinfo.profile`, `https://www.googleapis.com/auth/userinfo.email` |
| Account provisioning | User must be added to the account via the Bright Data Control Panel first. User record is created after signing up using "Continue with Google". |
20. Save changes. **Now the integration is ready to work.**
**Notes**
* Okta Domain should be the one that appears in your app integration settings (**yourcompany.okta.com**), NOT the one you are seeing as an admin (yourcompany-admin.okta.com)
* Make sure the **Credentials** provided to Bright Data are correct, we cannot check them on our side.
- **Sign-in Redirect URI** is a must in order to make the SSO feature work correctly\
- **Initiate login URI** is needed if the you wants to be able to use the feature from the Okta Chrome extension or the Okta dashboard
***
## SSO technical reference
This section is for enterprise security teams completing vendor SSO questionnaires.
### Which SSO protocol is supported
Bright Data supports SSO via **OpenID Connect (OIDC) only**. SAML 2.0 is not supported. There is no SAML metadata XML, Entity ID, or ACS URL.
### Supported identity providers
* Okta
* Microsoft Entra ID (Azure AD)
* Google Workspace
### Which OIDC parameters to configure
| Parameter | Value |
| --------------- | ------------------------- |
| Protocol | OpenID Connect (OIDC) |
| User identifier | `email` claim |
| Required scopes | `profile email` |
| Required claims | `email` |
| Optional claims | `givenName`, `familyName` |
### How account provisioning works
| Identity provider | Provisioning method |
| ------------------ | ------------------------------------------------------------------------------------------------------------------------------------------------------------------------------------------------------------------------------------------------------------------------------------------ |
| Okta | Manual. Add users in the Bright Data Control Panel. User record is created automatically on first sign-in. |
| Microsoft Entra ID | Automatic via SCIM. |
| Google Workspace | Manual. Add users in the Bright Data Control Panel. User record is created automatically on first sign-in. The OIDC `hd` claim enforces the configured Workspace Domain. See [Google Workspace SSO setup](/general/authentication/How_to_set_up_SSO_with_Google_Workspace_in_Bright_Data). |
### Other SSO details
* Password logins can be disabled entirely.
* Access is controlled by users added to the account, not by email domain.
* Different user roles are available to restrict access per user.
### Google OAuth 2.0
Bright Data also supports login via Google OAuth 2.0.
| Parameter | Value |
| -------------------- | ------------------------------------------------------------------------------------------------------------------------------------------------ |
| Required scopes | `https://www.googleapis.com/auth/userinfo.profile`, `https://www.googleapis.com/auth/userinfo.email` |
| Account provisioning | User must be added to the account via the Bright Data Control Panel first. User record is created after signing up using "Continue with Google". |